I realize that being in the photographic arena for over three decades that my feelings about the light meter are biased. As a professional photographer it was and is my job to understand the tools of my trade and be able to relate them to the very image I am producing. I can come to the understanding that the statement of the age is that the histogram is the light meter of the twenty-first century, but that doesn’t mean I have to agree with it. With that said, I have generated numerous points to demonstrate that the light meter is still as important, if not more important, today as it was when it first was introduced in practice to the industry in the late 1930s. To understand the logic behind my claim, we first must understand a brief history as well as the job of the light meter and how it relates to exposure.
I have organized my paper into three main sections. First, the historical context of why it was so necessary to develop faster ways to calculate exposure from the days of experience and educated guessing. Second, the significance of evolving into a calculating device of light measurement. Finally, the digital age and the importance of programmable meters to establish proper exposure calculations to provide evidence that my claim has merit.
HISTORICAL CONTEXT
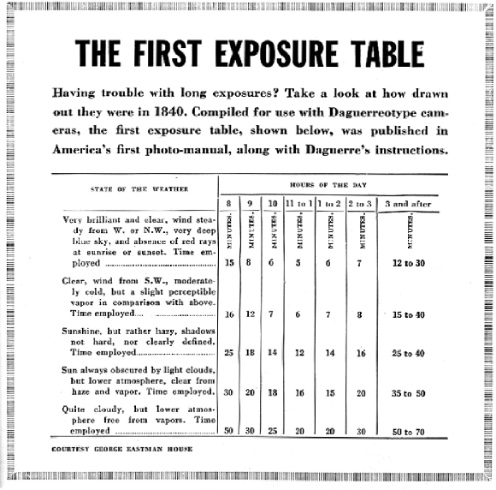
If you could imagine the earliest photographic emulsions, the Fox-Talbot Calotype & the Daguerreotype, were so insensitive to daylight (blue thru' UVA), that exposure times were a matter of educated guessing born only from experience. Exposures ran to several minutes even in high summer sunlight, it could take some time to setup and capture an individual portrait with a single capture. The first photographic exposures tables were published by C.F. Albanus in 1844 (see Example #1) and journals and manuals would often include such tables as a guide to exposure. Outside of the experience factor and the early influence of the tables, exposure was so varied and the process had very inconsistent results.
(Example #1)
The earliest commercial photographic exposure meter was Claudet's Photographometer, 1848, described in "The History And Practice Of The Art Of Photography; Or The Production Of Pictures Through The Agency Of Light" by Henry H. Snelling, Published BY G. P. Putnam, 155 Broadway, 1849. History And Practice Of The Art Of Photography
Frederick Scott Archer's invention of the Collodion process in 1851 led to subsequent improvements by Bolton & Sayce in 1864 which marked an increase in sensitivity, yet exposures in full sunlight still required several seconds, and because the collodion & silver salts emulsion was prepared by hand for each batch of glass plates, the speed of the batches varied, leaving the photographer the chore of determining the exposure based, again, on personal experience. Formal measurements were first conducted and published by Bunsen and Roscoe in 1858 which connected sunlight with the position of the sun to time of the day and year.
The invention of the gelatin dry plate silver bromide process in 1871 by Richard Leach Maddox, and the subsequent commercial sale of hard emulsion dry plates by Charles Bennett in 1878, led to a further increase in sensitivity and a need for a means of measuring reflected light in order to determine the exposure time. Hence, the birth of a light measuring device or meter.
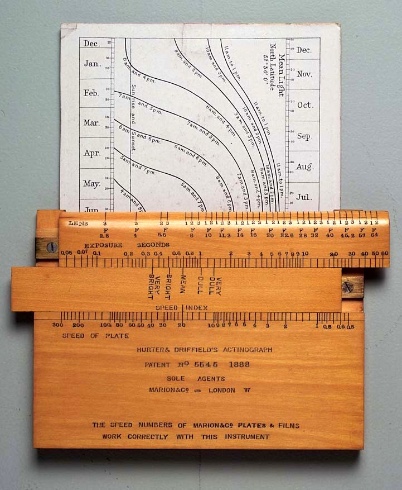
The Bing graduated wedge actinometer, invented in 1866-68, provided a numerical value for light, as compared to a relative comparison of plate sensitivities provided by Claudet's Photographometer and Brice's 1876 patented instrument that tested the developing chemicals & light conditions by making test strip exposures. The earliest calculator introduced by Hurter & Driffield in 1888 (see example #2) was the result of their extensive work on emulsion densitometry. The “Actinograph” was a slide rule calculator designed for use in England and sold by Marion & Co. starting from 1892.
(Example #2)

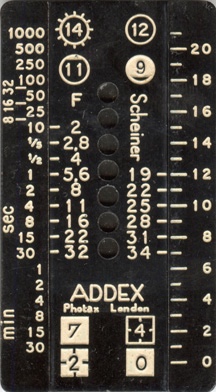
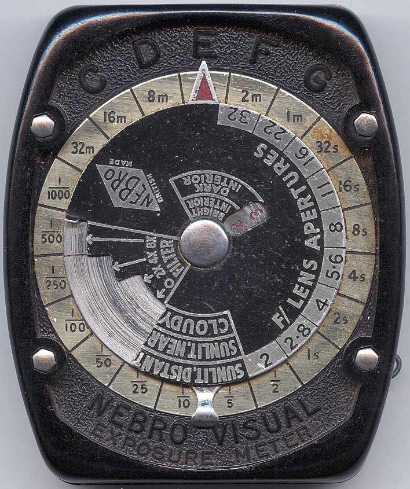
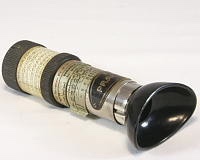
Leaping forward to the next improvement in light meter technology in the late 1920’s to early 1930’s, you find the popularity of light meters called extinction meters. (see examples #3 & 4). Although first developed by Decoudun (1887), this was unusual in that the meter was placed against the focusing screen of the camera to take a reading. Much later Franke & Heidecke produced an attachment where an iris was placed on the viewing lens of the twin-lens Rolleiflex camera, the extinction point was judged on the focusing screen. A variation was to record the intensity of light on a phosphorescent tablet and then place the variable density scale over it, this was proposed by Warnerke. An early tubular form of the meter was Tylar's Pickard of around 1889 (example #5). It contained a numbered or lettered row of neutral density filters of increasing density. The photographer would position the meter in front of his subject and note the filter with the greatest density that still allowed incident light to pass through. The letter or number corresponding to the filter was used as an index into a chart of appropriate aperture and shutter speed combinations for a given ISO.
(Example #3, Photax Addex Extinction Meter 1939) (Example #4, Nebro Visual Extinction Meter 1949)
(Example #5, Tylar's Pickard Early Tubular Form 1889)
Extinction meters suffered from the problem that they depended on the light sensitivity of the human eye (which can vary from person to person) and subjective interpretation. Not unlike the interpretation that it takes, today, to analyze a histogram or waveform from a digital camera back.
THE ADVENT OF THE HANDHELD METER
Later meters removed the human element and relied on technologies incorporating selenium, CdS, and silicon photodetectors. Selenium and silicon light meters use sensors that are photovoltaic: they generate a voltage proportional to light exposure. Selenium sensors generate enough voltage for direct connection to a meter; they need no battery to operate and this made them very convenient in completely mechanical cameras. Selenium sensors, however, cannot measure low light accurately (ordinary light-bulbs can take them close to their limits) and are altogether unable to measure very low light, such as candlelight, moonlight, starlight etc. Silicon sensors need an amplification circuit and require a power source such as batteries to operate. CdS light meters use a sensor based on photo-resistance, i.e. their electrical resistance changes proportionately to light exposure. These also require a battery to operate. Most modern light meters use silicon or CdS sensors. They indicate the exposure either with a needle galvanometer or on an LCD screen. Of course, LCD meters are really all that you see in todays’ digital marketplace.
Many modern professional and consumer still and video cameras include a built-in meter that measures a scene-wide light level or the ability to provide a wide variety of points to establish levels of light and are able to make an approximate measure of appropriate exposure based on using a so called histogram as the dependent. These devices use one of two general types of meters, reflected-light metering. Reflected-light meters measure the light reflected by the scene to be photographed. All in-camera meters are reflected-light meters. Reflected-light meters are calibrated to show the appropriate exposure for “average” scenes for example. A unusual scene with a preponderance of light colors or specular highlights would have a higher reflectance; a reflected-light meter taking a reading would incorrectly compensate for the difference in reflectance and
lead to underexposure. Badly underexposed sunset photos are common due to this effect. The brightness of the setting sun fools the camera's light meter. Unless the in-camera logic or the photographer take care to compensate, the picture will be grossly underexposed and dull.
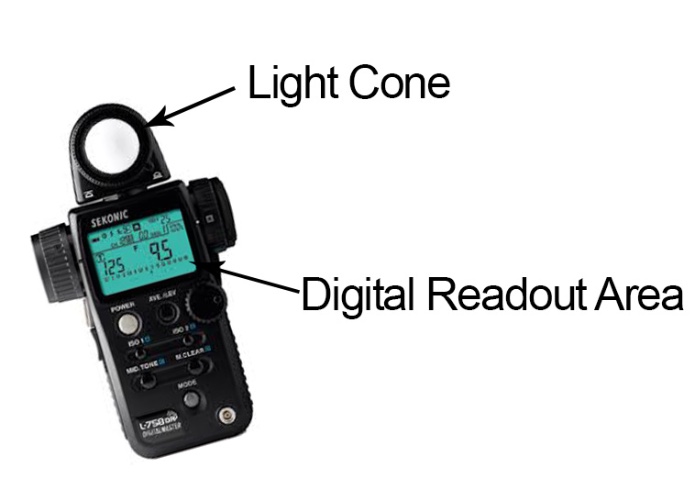
Hand held light meters use the second general type of metering, incident-light metering. Incident-light meters measure the amount of light falling on the subject. It uses a integrating sphere (a translucent hemispherical plastic dome) placed on top of the light sensor (see example #6). Because the incident-light reading is independent of the subject's reflectance, it is less likely to lead to incorrect exposures for subjects with unusual average reflectance. Taking an incident-light reading requires placing the meter at the subject's position and pointing it in the direction of the light source you are trying to evaluate. Something not always achievable in practice would be landscape photography where the subject distance approaches infinity.
(Example #6)
Another way to avoid under-or over-exposure for subjects with unusual reflectance is to use a spot meter. This reflected-light meter that measures light in a very tight cone, typically with a one degree circular angle of view. Both in camera and hand held meters can achieve spot metering in most cases. An experienced photographer can take multiple readings over the shadows, midrange and highlights of the scene to determine optimal exposure, using systems like The Zone System. Many modern cameras include sophisticated multi-segment metering systems that measure the luminance of different parts of the scene to determine the optimal exposure. When using a film whose spectral sensitivity is not a good match to that of the light meter, for example, orthochromatic black-and-white or infrared film, the meter may require special filters and re-calibration to match the sensitivity of the film.
THE DIGITAL AGE
Digital cameras are electronic devices, and because they are, each camera is dependent on it’s own electronic circuitry chip or board to exact to one another. Unfortunately, each camera is not programmed or created equally, giving you a large gap in exposure ranges for each camera or electronic device. That issue alone will create exposure to shift from camera to camera even if they come off of the production line right after one another. This is where the programmable light meter in today’s world makes all the difference.
The programmable light meter can be adjusted or programed to your camera’s certain flaws, and after they are programed correctly, produce exact and proper meter reading that will pin point exposure. No more guesswork from the early days of exposure charts and educated users. It’s done through photographing a unique white, gray and black sequence that then gets coupled with your camera’s settings to send data to then get interrupted through computer software to find perfect neutral grey through your camera’s metering system. Many light meter models have up to three programmable channels to support multiple cameras (see example #6). This reason alone would be reason enough why using a light meter today would create a unique advantage when dealing with exposure.
In almost all cases, an incident-light meter will cause a medium tone to be recorded as a medium tone, and a reflected-light meter will cause whatever is metered to be recorded as a medium tone as long as the constant of ISO is recorded properly. What constitutes a “medium tone” depends on meter calibration and several other factors, including film processing or digital image conversion. Meter calibration establishes the relationship between subject lighting and recommended camera settings. The calibration of photographic light meters is covered, again, by ISO.
Built-in light meters have been around since the late 1930’s, taking general meter readings to establish exposure easier and quicker. Today’s histogram or waveform is really more of a densitometer than a light meter calculating general exposure within the 5-6 stops of dynamic range capability of most digital imaging chips. So why the sudden movement toward the histogram being today’s meter? The reasons, I believe, are numerous. Simply put, I believe that most photographers today are just not educated properly in the field with the tools and knowledge to use them. But, now that we understand the basics of the light meter and the importance to the photographic industry, it’s time it list some additional reasons why the hand held light meters role in today’s digital world are so significant and why I think the light meter is a critical tool to use with digital camera systems.
Using a meter gives you power to precisely control the look of your images. Great lighting doesn’t just happen by accident; or by blasting light everywhere on set and recording it. Great lighting happens through control and precision. If you want your images to stand out from the crowd, you need to be purposeful and intentional with your lighting. This means you need to know how your camera responds to light. Then you need to precisely place those values where you want them in the frame through careful planning and lighting. The only way to know precisely where those values fall is through the use of a programable digital light meter. A waveform or histogram can give you a good overview of a scene; but it can’t tell you that you need a full stop more light in one area, or that you need a half stop less of light to get to where you want to be. It only tells you that you need more or less light. Precise controls come from precise programmed instruments, which the histogram is not.
The ability to match shots or scenes shot at separate times or at different locations. If you know what your light levels are for a given scene, then you can come back and shoot additional shots for that scene weeks or months later and they will match perfectly. Even if you end up using different lighting instruments then what you initially shot with. Furthermore, by knowing the light levels of the initial scene, you can make a completely different location match the original location through lighting and creative camera work. I have worked on several projects where I have had to keep a consistent look throughout the project, but the scenes were shot over many weeks, even months, in different locations, and yet the end result looked and felt like it was all shot in the same place, using the same location. If I didn’t have my meter and didn’t know the light levels for each shot the look would have been inconsistent.
Know if a specific look will hold up. Today’s digital cameras offer a lot of flexibility in the looks they create both in camera, and then later through the final inspection. If the time is taken during pre-production to test various looks, you can transfer the information you learn in prep to your meter. Then by taking readings on set you will have an accurate way to know for sure if the details in that black car will hold up after the shot has gone through the final viewing. By doing this in advance is a lot more affordable than having to re-shoot something, or take the final look in a completely different direction because it didn’t hold up.
Using a meter makes you efficient, makes you faster on location or in the studio. It seems like these days there is a continual push to work faster and get more done in a day. So I am always looking for tools that allow me to be more efficient as well as allow me to deliver the quality images I desire. My meter does just that. By using a light meter, I can take measurements and know exactly what changes need to happen instead of guessing. It also gives me a clear, precise means of communication. I can tell my assistant I need to achieve F/8 at this location, or I can say I need a 1/2 stop less light over there. During preproduction, I can also talk with my assistant and say: “I want my key to be at F/8 @ ISO 400, my fill at F/5.6, and my kicker to be at F/4”. Or I can say “I want a key to fill ratio of 3:1”, and then he or she can make informed suggestions on the type of lighting units we should use to get my desired results. This a lot faster than just saying, “I need more or less light here,” and then making several adjustments to get to the correct levels.
The ability to light multiple locations at the same time. Say at a wedding or pre-light the day before: Lugging a camera system around with you to light your locations not only adds extra work; but it can also incur additional expense and time that can easily be avoided. By knowing how your camera system responds to light by programming your light meter, you can use that meter to light a secondary set while you are shooting on the first set. Or you can be lighting the set the day before to make the shoot day go smoother and quicker. I have worked on productions where we had to shoot in 2 or 3 locations in one day only having one camera system. I did not have the time to transfer the camera back and forth to preview the scene. By knowing how the camera system responds to light, I was able to have each set lit and ready to go before the camera arrived, allowing me to make our day, and keep the budget reasonable.
Post production is easier, quicker, and more affordable. By maintaining consistent light levels within a scene it means that when it comes time to look through the images less tweaking and shot matching has to be done in-between individual shots. This speeds up the reviewing session, and it allows for more time to look through the images than correcting or balancing them. And, consequently, it also reduces the post production costs on commercial work. I have worked on productions where the turnaround was so tight that there wasn’t time to do any viewing or correction. The end imaging was a straight edit and burn to disk. Because I had controlled the light levels and maintained a consistent look shot to shot, post production was a breeze and no one ever knew that the images were not color corrected or evaluated.
Using a meter gives you knowledge about how a camera responds to light. The one consistent with digital cinema cameras these days is that they all place mid-tone at different values. Depending on the camera system and the recording format, mid-tone can fall anywhere from 12% (33%IRE) up to 18% (55%IRE). These are huge differences in placement, and you may or may not like where that placement falls. By using your programmable meter and testing your camera system, you can get an accurate representation of how that camera responds to light.
Scout a location and know what you need in terms of light levels. By carrying your meter with you on a location scout, you can measure the light levels and know exactly what it will take to get your exposure to the levels you need, and what challenges the location presents. Knowing this information beforehand will enable you to be better prepared going into the shoot, and save you a lot of time and headache on set.
Your eye is trained to judge light levels. The more you work with a light meter, the more you can train your eye to get a better sense of what different light levels and lighting ratios look like. As you train your eye to see these levels, you will also gain the knowledge of what the lighting requirements are to get there. Over time, as you train your eye you will be able to light faster, and make more informed lighting choices.
If these reasons aren’t enough to convince you that a light meter is still one of the most important pieces of equipment to have in the digital age, let me add one more item that, I believe, is the most crucial when dealing with the digital platform.
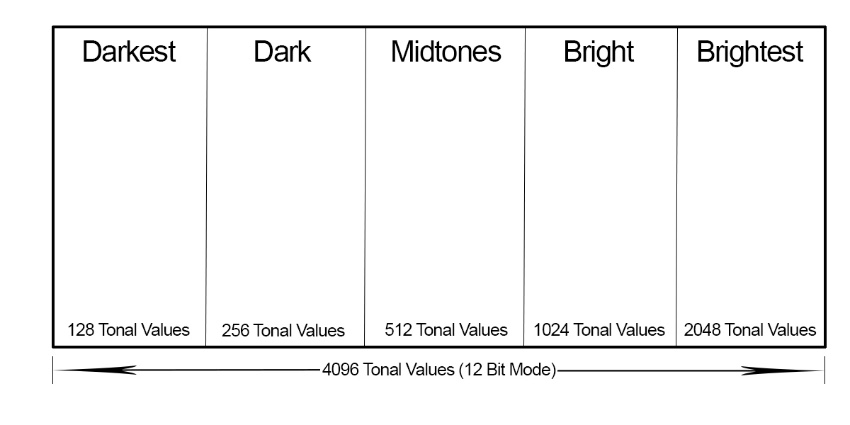
Your digital camera reads only in a reflective meter mode, as discussed earlier, and it applies those signals to a GIF file that shows you a reading on the back of your digital camera by way of that histogram. Your digital SLR has the dynamic range of 5 to 6 stops. When working in RAW mode, which you should be, most cameras record a 12 bit image. (Yes, we say it’s in 16 bit mode, but in reality it’s only 12 to 14 bits in a 16 bit space.) A 12 bit image is capable of recording 4,096 discrete tonal values. One would think, therefore, each F/Stop of the 5 to 6 stop range would record the same 850 or so levels of these stops. This isn’t the case; the way that really works is that the first (brightest) stop contains 2048 of these tonal values, just half of those available. Why? Because CCD and CMOS sensors are linear devices. And, like an F/Stop records half of the light of the one previous one, therefore half of the remaining tonal values. So the next area down from brightest is bright, having 1024 tonal levels. Mid-tones with 512 tonal values, dark tones with 256 tonal levels and the darkest tones with 128 tonal values. (see Example #7) This realization carries with it a number of important lessons, the most important being that if you do not use the right-hand fifth of the histogram for recording some of your image you are in fact wasting fully half of the available encoding levels of your camera. But, we all know that the worst sin in digital is to blow out highlights. Once they’re blown (past the right-hand edge of the histogram) the data is gone. Well, the GIF file is the smallest of known files, it doesn’t have the entire digital dynamic range accessible and en-turn may tell you that data is off the right-hand edge without truly being thrown off. That histogram or waveform could throw you off by as much as a stop or more when using it as a guide causing major underexposure.
(Example #7)
In so many ways, the light meter has evolved into so much more than just a way to read light. The digital age has turned this very simple tool into one of the most helpful and essential piece of photographic equipment, more important today than it was almost 80 years ago.